Windows나, OSX 혹은 여느 리눅스 데스크탑을 사용해도 위의 화면 레이아웃을 만들려면, 기본 제공되거나 3rd party 윈도우 레이아웃 어플리케이션으로 할 수 있다. 그런 게 없더라도 그냥 마우스로 크기를 늘이고 줄이고 옮기고 하면 된다. 그런데, 서로 다른 레이아웃의 화면을 유지하고 전환해가면서, 혹은 옮겨가면서 하려면 어떻게 해야 할까?
현 시점의 여타 OS가, 혹은 여타 윈도우 레이아웃 어플리케이션이 어떤 수준의 윈도우 레이아웃 관리를 제공해주는 지 모르겠지만, 그런 일을 가장 잘 하는 녀석 중의 하나가 바로 i3wm이다.
업무에서 리눅스 데스크탑을 사용한지는 6년째인데, i3wm을 만난 이후로의 만족감이 가장 크다. 그래서 사용중인던 낡은 맥북도 과감하게 Lubuntu 18.04을 설치할 수 있었다. 다시 말하면, 나에게는 리눅스 계열을 반드시 써야만 하게 하는 첫 번째 이유이다.
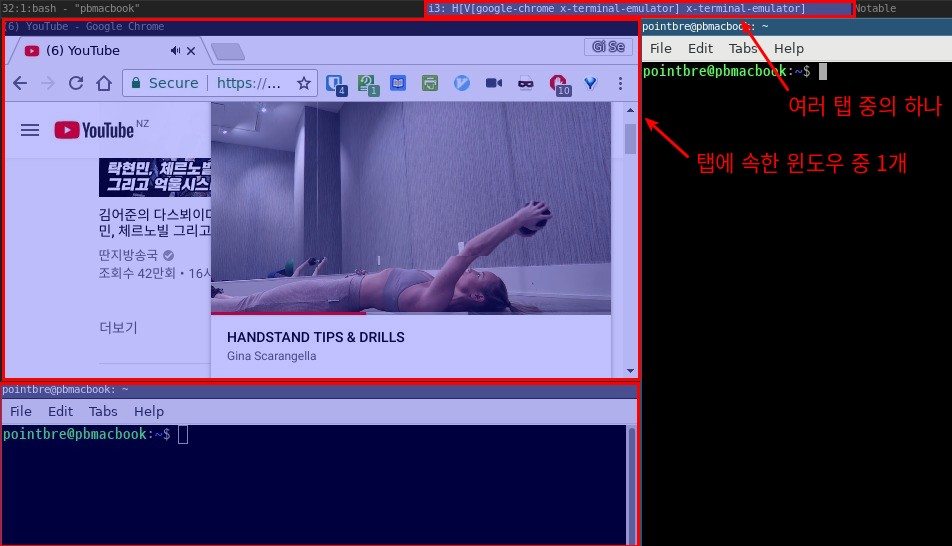
이 글을 쓰면서 대충 만들어본 레이아웃 스크린샷이다. 상단 영역 중 bash, i3…, Notable이라고 보이는 것은 탭 표시줄이다. 탭은 1개의 화면 레이아웃이라고 생각하면 된다. 탭 안에 아래와 같이, 여러 개의 분할된 윈도우를 배치할 수 있다.
설치
데비안/우분투 계열이라면 최근 버전을 업데이트 해주는 repository를 통해서 설치하는 것이 좋을 듯 하다. 거기에 나온 대로 하면 설치가 된다. 주의할 점은 설치시 사용하는 keyring이 시간이 지나면 만료되어 apt update 등에서 error를 뿜어낼 수 있다는 것이다. 그 때는 위의 repository로 가서 keyring.deb만 다시 받아서 설치해주면 된다.
기타 리눅스의 경우 다운로드로 가서 설치하는 방법을 찾아본다.
Mod key
i3wm은 주로 키보드를 가지고 제어할 수 있기 때문에 단축키들에 익숙해지는 것이 중요하다. 개인적으로는 맥북에 리눅스를 설치한 후, option 키와 Command 키를 swap해서 일반 키보드처럼, control 키 + command 키(= super 키) + option 키(= alt 키)처럼 맵핑해서 사용중이라서, command 키(= super 키)를 mod 키로 사용중이다.
참고로, 키 맵핑을 확인하려면 xmodmap을 실행하면 된다.
$ xmodmap
xmodmap:  up to 4 keys per modifier, (keycodes in parentheses):

shift       Shift_L (0x32),  Shift_R (0x3e)
lock        Caps_Lock (0x42)
control     Control_L (0x25),  Control_R (0x69)
mod1        Alt_L (0x40),  Meta_L (0xcd)
mod2        Num_Lock (0x4d)
mod3
mod4        Super_L (0x85),  Super_R (0x86),  Super_L (0xce),  Hyper_L (0xcf)
mod5        ISO_Level3_Shift (0x5c),  Mode_switch (0xcb)
Mod1은 Alt키이고, Mod4는 Super키(Command 키)이다. 기본 mod키인 Alt대신에 Super키를 사용하려면 ~/.config/i3/config에서 set $mod 부분을 찾아서 set $mod Mod4로 변경해야 한다.
Alt + Shift + r 눌러서 i3wm을 재시작하면 이제부터는 Super 키를 i3wm의 mod키로 사용할 수 있다.
기본 사용법
Tile layout
테스트를 위해 mod키 + enter를 해서 터미널이 실행된다. 한번 더 해보면 두 터미널이 화면을 반반 채워진 형태로 배치될 것이다. 바로 그것이 tiling window manager를 쓰는 이유다. 즉, 어플리케이션 실행시 기본적으로 tile 레이아웃으로 배치되는 것이다.
Tab layout
하지만, i3wm은 정말 유용한 tab모드를 지원한다. 2개 터미널이 있는 상태에서 mod키 + w를 누르면 1개의 터미널이 풀 화면으로 배치되고 다른 하나는 다른 tab으로 숨겨졌다. tab간 이동을 위해서는 mod + 커서키를 누르면 된다. mod키 + 우측 커서키를 눌러서 tab 전환을 해보자.
Tab + Tile layout
i3wm을 쓰는 진짜 이유는 바로 이것이다. tab안에서 tile 레이아웃을 자유롭게 구성할 수 있다는 점이다. 한 tab에서 mod키+h를 누른 후 mod키 + enter를 해서 하나의 터미널을 더 띄워보자. 현재의 tab안에서 하나의 터미널이 가로를 2등분한 형태로 띄워졌을 것이다. 어플을 실행하기 전에 mod키+v나 h를 해서 tile 레이아웃을 지정한 채로 화면을 구성할 수 있다. Tab을 활용해서 모니터를 최대한 활용할 수 있고, tile 레이아웃을 통해 생산성을 높일 수 있으리라 생각된다.
Albert 사용을 위한 설정 변경
Albert는 OSX용 런쳐 중 하나인 Alfred의 리눅스 버전이다. 그런데, 두 프로그램의 모드키가 충돌하게 마련인데, 이를 방지하기 위해 mod키+a를 눌러서 albert를 사용하려고 한다. config 파일을 다음처럼 변경 및 추가한다.
# 기본 설정 변경
# Albert를 사용하므로 dmenu를 사용할 필요없다. 따라서 다음을 주석처리한다.
# start dmenu (a program launcher)
#bindsym $mod+d exec dmenu_run

# 기본 설정 변경
# a는 Albert를 위해 사용
# mod+p를 할당한다.
# focus the parent container
bindsym $mod+p focus parent

# 기본 설정 변경
# mod+c를 할당한다.
# focus the child container
bindsym $mod+c focus child
어플리케이션 자동 실행
이제 전혀 다른 desktop 환경을 사용중이므로 데스크탑 어플리케이션을 자동 실행하려면 i3wm의 config파일을 설정해야 한다. i3wm이 기본 제공하는 dmenu대신 albert를 사용중인데, i3wm안에서 같이 사용하려면 다음처럼 설정을 해줘야 한다.
# Autostart applications
exec --no-startup-id albert &
Albert를 hot key로 띄우기
이제 Albert는 부팅시에 시작된다. 그런데 이 상태에서 Albert의 hot key를 눌러도 albert가 보이질 않는다. i3wm에서는 다음을 config파일에 넣어서 별도의 핫키로 불러야 한다.
# mod+a 눌리면 Albert를 띄워준다.
bindsym $mod+a exec --no-startup-id albert show
이제 재부팅한 후, mod+a 누르면 바로 albert를 사용할 수 있다.
Scratchpad
i3wm을 쓰는 강력한 이유 중 하나인 scratchpad이다. 자주 쓰는 어플리케이션들을 넣어두고, 아무데서나 호출해서 floating 윈도우로 볼 수 있는데, 기본적으로는 scratchpad에 들어간 어플들이 표시되었다가 사라졌다가, 다음 어플리케이션이 표시되었다가 사라졌다가 하는 식으로 동작된다. 하지만 tag을 통해서 hot key를 가지고 바로 호출할 수 있는데, 엄청 편리하다. 개인적으로 이메일, 채팅, 노트 어플리케이션을 넣어두고 hot key를 통해 개별 호출하면서 사용하려고 한다.
Joplin이라는 어플리케이션을 scratchpad를 자동으로 보내고, hot key mod + Ctrl + t로 불러오는 설정은 다음과 같다.
# Automatically put applications to scratchpad
for_window [title="^Joplin$"] mark "joplin", move scratchpad

# Use hotkey to bring a application to front using con_mark
bindsym $mod+Ctrl+t [con_mark="joplin"] scratchpad show
즉, 윈도우 타이틀을 기반으로, “Joplin”이라고 마킹한 후, scratchpad로 자동으로 보내둔 후, 바인드된 키가 눌리면, 키에 할당된 마킹을 가지고, scratchpad에서 불러내서 보여주는 것이다.
Screen saver
화면 보호기를 찾다가 구글링을 통해 다음처럼 구현했다. 10분간 아무 동작없으면 자동으로 화면을 잠그고, 화면보호 화면은 현재 스크린을 캡쳐한 후 pixelate 처리했다. 수동으로는 mod + Shift + Ctrl + l 눌러서 바로 잠금 수도 있다.
# Lock screen
bindsym $mod+Shift+Ctrl+l exec /path_to_shell_script/lock.sh

# Automatically lock screen after 10 mins inactivity
exec --no-startup-id xautolock -time 10 -locker /path_to_shell_script/lock.sh
lock.sh는 다음처럼 작성하는데, 실행을 위해서는 sudo apt-get install -y imagemagick해서 imagemagick을 설치해야 한다.
#!/bin/bash
revert() {
  xset dpms 0 0 0
}
trap revert HUP INT TERM
# 화면 캡쳐 후 1/10로 축소 후 10배 확대해서 모자이크 처리
convert x:root -scale 10% -scale 1000% /tmp/screen.png
# 화면 off 처리
xset +dpms
xset dpms force off
# 깨어나면 lock 화면 표시
i3lock -n -i /tmp/screen.png
rm /tmp/screen.png
revert
이제 화면이 잠길 때마다, 잠기기 직전의 화면을 기반으로 화면이 보호되고 일정 시간이 지나면 꺼지게 된다.
Hot key 정리
- mod + Return - 터미널 실행
- mod + Shift + q - 현재 선택된 창 닫기
- mod + j/k/h/l or 커서키 - 포커스 이동
- mod + Shift + j/k/h/l or 커서키 - 창 이동
- mod + \ - horizontal split
- mod + - - vertical split
- mod + f - toggle full screen
- mod + s - stacking layout
- mod + w - tabbed layout
- mod + e - split layout
- mod + Shift + space - toggle tiling/floating
- mod + space - tiling/floating 창 간 포커스 이동
- mod + p - 부모 창으로 포커스 이동
- mod + c - 자식 창으로 포커스 이동
- mod + 1~0 - workspace 1~10으로 전환
- mod + Shift + 1~0 - 현재 창들을 workspace 1~10으로 이동
- mod + Shift + r - restart i3
- mod + Shift + e - exit i3
- mod + r - 리사이즈 모드 진입 후 j/k/h/l이나 커서키로 사이즈 조정 후 Enter/Esc/mod+r 눌러서 종료
xev
i3wm의 key binding을 변경하려면, xev를 실행 후 원하는 키를 누른 후 나오는 화면에서 해당 키의 KeyPress 이벤트 정보에서 keysym 항목에 출력되는 아이디를 사용해야 한다. 다음의 예는 백슬래시를 누른 경우이다.
KeyPress event, serial 33, synthetic NO, window 0x3000001,
    root 0x254, subw 0x0, time 1679601, (947,472), root:(951,494),
    state 0x0, keycode 51 (keysym 0x5c, backslash), same_screen YES,
    XLookupString gives 1 bytes: (5c) "\"
    XmbLookupString gives 1 bytes: (5c) "\"
    XFilterEvent returns: False
어플과의 이슈들
파일매니저
i3wm과 잘 호환되지 못하는 앱 중 하나가 Nautilus인듯 하다. 그래서 우분투에선 thunar를 사용했다. Lubuntu의 PCManFM은 별 문제없어 보인다.
화면 캡춰
몇몇 어플의 경우 i3wm에서 제대로 동작하지 않았다. 그동안 쭉 사용하던 shutter를 해보니 무난하게 작동했다.
Lubuntu에서 xfce-power-manager
맥북의 Lubunt 18.04에 i3wm을 설치한 이후로 잘 동작하던 fn+f1/f2 밝기 조절이 되지 않았다. 찾아보니 xfce-power-manager가 자동으로 실행되지 않아서였다. config에 다음을 추가해서 항상 실행되도록 해주면 된다.
exec_always --no-startup-id xfce4-power-manager
Evolution
메일 계정 암호 변경시, i3안에서는 변경이 되지 않는다. 왜냐하면 그 계정이 Gnome 환경하에서 Microsoft Exchange server로 등록되었기 때문이다. 그래서 암호 변경시에는 Gnome으로 로그인해서 변경해야한다.
i3m + Ubuntu 16.04에서 기본 어플리케이션 지정
테스트해보니 deprecated된 ~/.local/share/applications/mimeapps.list이 사용되는 듯 하다. 찾아보니 Gnome에서 사용되던 파일, /etc/gnome/defaults.list을 발견했다.
cp -f /etc/gnome/defaults.list mimeapps.list해서 복사
기본 파일 매니저를 Thunar로 지정: xdg-mime default Thunar.desktop inode/directory
기본 브라우저를 Chrome으로 지정:
xdg-mime default google-chrome.desktop application/xhtml+xmlxdg-mime default google-chrome.desktop text/htmlxdg-mime default google-chrome.desktop text/xmlxdg-mime default google-chrome.desktop x-scheme-handler/http
xdg-open test_file_name 해서 테스트
지금 사용중인 config 파일(~/.i3/config)
실제 사용중인 파일이다. 물론 너무 개인적인 설정들을 제외했지만, 기본적인 기능을 설정하는 데에는 충분할 것으로 생각된다.
# This file has been auto-generated by i3-config-wizard(1).
# It will not be overwritten, so edit it as you like.
#
# Should you change your keyboard layout some time, delete
# this file and re-run i3-config-wizard(1).
#

# i3 config file (v4)
#
# Please see https://i3wm.org/docs/userguide.html for a complete reference!

set $mod Mod4

# Font for window titles. Will also be used by the bar unless a different font
# is used in the bar {} block below.
font pango:monospace 8

# This font is widely installed, provides lots of unicode glyphs, right-to-left
# text rendering and scalability on retina/hidpi displays (thanks to pango).
#font pango:DejaVu Sans Mono 8

# Before i3 v4.8, we used to recommend this one as the default:
# font -misc-fixed-medium-r-normal--13-120-75-75-C-70-iso10646-1
# The font above is very space-efficient, that is, it looks good, sharp and
# clear in small sizes. However, its unicode glyph coverage is limited, the old
# X core fonts rendering does not support right-to-left and this being a bitmap
# font, it doesn’t scale on retina/hidpi displays.

# use these keys for focus, movement, and resize directions when reaching for
# the arrows is not convenient
# Changed from i/j/k/l to j/k/h/l
set $up j
set $down k
set $left h
set $right l

# Use Mouse+$mod to drag floating windows to their wanted position
floating_modifier $mod

# start a terminal
bindsym $mod+Return exec i3-sensible-terminal

# kill focused window
bindsym $mod+Shift+q kill

# Not used. Instead, albert will be used.
# start dmenu (a program launcher)
#bindsym $mod+d exec dmenu_run
# There also is the (new) i3-dmenu-desktop which only displays applications
# shipping a .desktop file. It is a wrapper around dmenu, so you need that
# installed.
# bindsym $mod+d exec --no-startup-id i3-dmenu-desktop

# change focus
bindsym $mod+$left focus left
bindsym $mod+$down focus down
bindsym $mod+$up focus up
bindsym $mod+$right focus right

# alternatively, you can use the cursor keys:
bindsym $mod+Left focus left
bindsym $mod+Down focus down
bindsym $mod+Up focus up
bindsym $mod+Right focus right

# move focused window
bindsym $mod+Shift+$left move left
bindsym $mod+Shift+$down move down
bindsym $mod+Shift+$up move up
bindsym $mod+Shift+$right move right

# alternatively, you can use the cursor keys:
bindsym $mod+Shift+Left move left
bindsym $mod+Shift+Down move down
bindsym $mod+Shift+Up move up
bindsym $mod+Shift+Right move right

# split in horizontal orientation
# Changed from h to backslash like tmux
bindsym $mod+backslash split h

# split in vertical orientation
# Changed from v to minus like tmux
bindsym $mod+minus split v

# enter fullscreen mode for the focused container
bindsym $mod+f fullscreen toggle

# change container layout (stacked, tabbed, toggle split)
bindsym $mod+s layout stacking
bindsym $mod+w layout tabbed
bindsym $mod+e layout toggle split

# toggle tiling / floating
bindsym $mod+Shift+space floating toggle

# change focus between tiling / floating windows
bindsym $mod+space focus mode_toggle

# focus the parent container, changed to p(parent)
bindsym $mod+p focus parent

# focus the child container, changed to c(child)
bindsym $mod+c focus child

# Define names for default workspaces for which we configure key bindings later on.
# We use variables to avoid repeating the names in multiple places.
set $ws1 "1"
set $ws2 "2"
set $ws3 "3"
set $ws4 "4"
set $ws5 "5"
set $ws6 "6"
set $ws7 "7"
set $ws8 "8"
set $ws9 "9"
set $ws10 "10"

# switch to workspace
bindsym $mod+1 workspace $ws1
bindsym $mod+2 workspace $ws2
bindsym $mod+3 workspace $ws3
bindsym $mod+4 workspace $ws4
bindsym $mod+5 workspace $ws5
bindsym $mod+6 workspace $ws6
bindsym $mod+7 workspace $ws7
bindsym $mod+8 workspace $ws8
bindsym $mod+9 workspace $ws9
bindsym $mod+0 workspace $ws10

# move focused container to workspace
bindsym $mod+Shift+1 move container to workspace $ws1
bindsym $mod+Shift+2 move container to workspace $ws2
bindsym $mod+Shift+3 move container to workspace $ws3
bindsym $mod+Shift+4 move container to workspace $ws4
bindsym $mod+Shift+5 move container to workspace $ws5
bindsym $mod+Shift+6 move container to workspace $ws6
bindsym $mod+Shift+7 move container to workspace $ws7
bindsym $mod+Shift+8 move container to workspace $ws8
bindsym $mod+Shift+9 move container to workspace $ws9
bindsym $mod+Shift+0 move container to workspace $ws10

# reload the configuration file
# bindsym $mod+Shift+c reload
# restart i3 inplace (preserves your layout/session, can be used to upgrade i3)
bindsym $mod+Shift+r restart
# exit i3 (logs you out of your X session)
bindsym $mod+Shift+e exec "i3-nagbar -t warning -m 'You pressed the exit shortcut. Do you really want to exit i3? This will end your X session.' -b 'Yes, exit i3' 'i3-msg exit'"

# resize window (you can also use the mouse for that)
mode "resize" {
        # These bindings trigger as soon as you enter the resize mode

        # Pressing left will shrink the window’s width.
        # Pressing right will grow the window’s width.
        # Pressing up will shrink the window’s height.
        # Pressing down will grow the window’s height.
        bindsym $left  resize shrink width 10 px or 10 ppt
        bindsym $down  resize grow height 10 px or 10 ppt
        bindsym $up    resize shrink height 10 px or 10 ppt
        bindsym $right resize grow width 10 px or 10 ppt

        # same bindings, but for the arrow keys
        bindsym Left  resize shrink width 10 px or 10 ppt
        bindsym Down  resize grow height 10 px or 10 ppt
        bindsym Up    resize shrink height 10 px or 10 ppt
        bindsym Right resize grow width 10 px or 10 ppt

        # back to normal: Enter or Escape or $mod+r
        bindsym Return mode "default"
        bindsym Escape mode "default"
        bindsym $mod+r mode "default"
}

bindsym $mod+r mode "resize"

# Start i3bar to display a workspace bar (plus the system information i3status
# finds out, if available)
bar {
  # To specify monitor to display system tray
  # tray_output LVDS-0
  status_command i3status
}

#############################
# Albert                    #
#############################
# Pop up Albert window
bindsym $mod+a exec --no-startup-id albert show

# Autostart albert
exec --no-startup-id albert &

#############################
# Lock and screen saver     #
#############################
# Lock screen manually
bindsym $mod+Ctrl+Shift+l exec ~/Data/Works/Private/Utils/i3/lock.sh

# Automatically lock screen after 10 mins inactivity
exec --no-startup-id xautolock -time 10 -locker ~/Data/Works/Private/Utils/i3/lock.sh

#############################
# Run udiskie               #
#############################
# Automatically start udiskie
exec --no-startup-id ~/Data/Works/Private/Utils/udiskie/udiskie.sh

#############################
# Power manager for Lubuntu #
#############################
# exec_always --no-startup-id xfce4-power-manager

#############################
# Run scrcpy                #
#############################
# Scrcpy
bindsym $mod+Shift+s exec --no-startup-id ~/Data/Works/Private/Utils/scrcpy/scrcpy_call.sh show

# Monitor phone connection to launch scrcpy automatically
exec --no-startup-id  ~/Data/Works/Private/Utils/scrcpy/phone_monitor.sh

#############################
# Scratchpad                #
#############################
# Automatically put applications to scratchpad
# for_window [title="^Inbox - Evolution"] mark "evolution", move scratchpad
# for_window [title="^Buddy List$"] mark "pidgin", move scratchpad
# for_window [title="^Joplin$"] mark "joplin", move scratchpad
# for_window [title="^Mi A2$"] mark "scrcpy", move scratchpad
# for_window [title="^Google Play Music Desktop Player$"] mark "gpmd", move scratchpad

# Use hotkey to bring a application to front using con_mark
# bindsym $mod+Ctrl+e [con_mark="evolution"] scratchpad show
# bindsym $mod+Ctrl+p [con_mark="pidgin"] scratchpad show
# bindsym $mod+Ctrl+t [con_mark="joplin"] scratchpad show
# bindsym $mod+Ctrl+s [con_mark="scrcpy"] scratchpad show
# bindsym $mod+Ctrl+g [con_mark="gpmd"] scratchpad show

#############################
# Sync notes                #
#############################
exec --no-startup-id ~/Data/Works/Private/Utils/git/sync_notes.sh

#############################
# Default focus on ws 1     #
#############################
exec --no-startup-id i3-msg workspace 1

#############################
# Shortcut keys for Shutter #
#############################
# Area
bindsym $mod+Shift+a exec --no-startup-id ~/Data/Works/Private/Utils/i3/shutter_area.sh show
# Full
bindsym $mod+Shift+f exec --no-startup-id ~/Data/Works/Private/Utils/i3/shutter_full.sh show